Style 1.

Hi all,

So sorry for my ridiculous blogging hiatus! But then, life happens, what can you do?

Anyway, today I wanted to talk about some great new looks from ASOS that I personally love. This post is NOT sponsored, it is purely my own opinions. Let me know what you think!

First off, I want to admire the beauty of this coat:

image

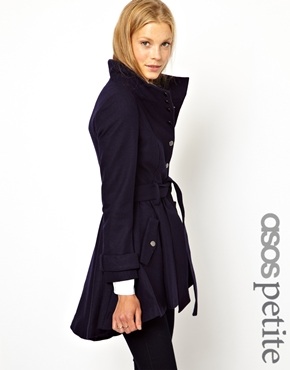
I just think that the classic silhouette with the modern collar and hemline is beautiful and infinitely wearable. It’s great for chilly winter days but it is so much more aesthetically gorgeous than a ski coat, and I could see myself pairing it with a great jean, booties and statement earrings.

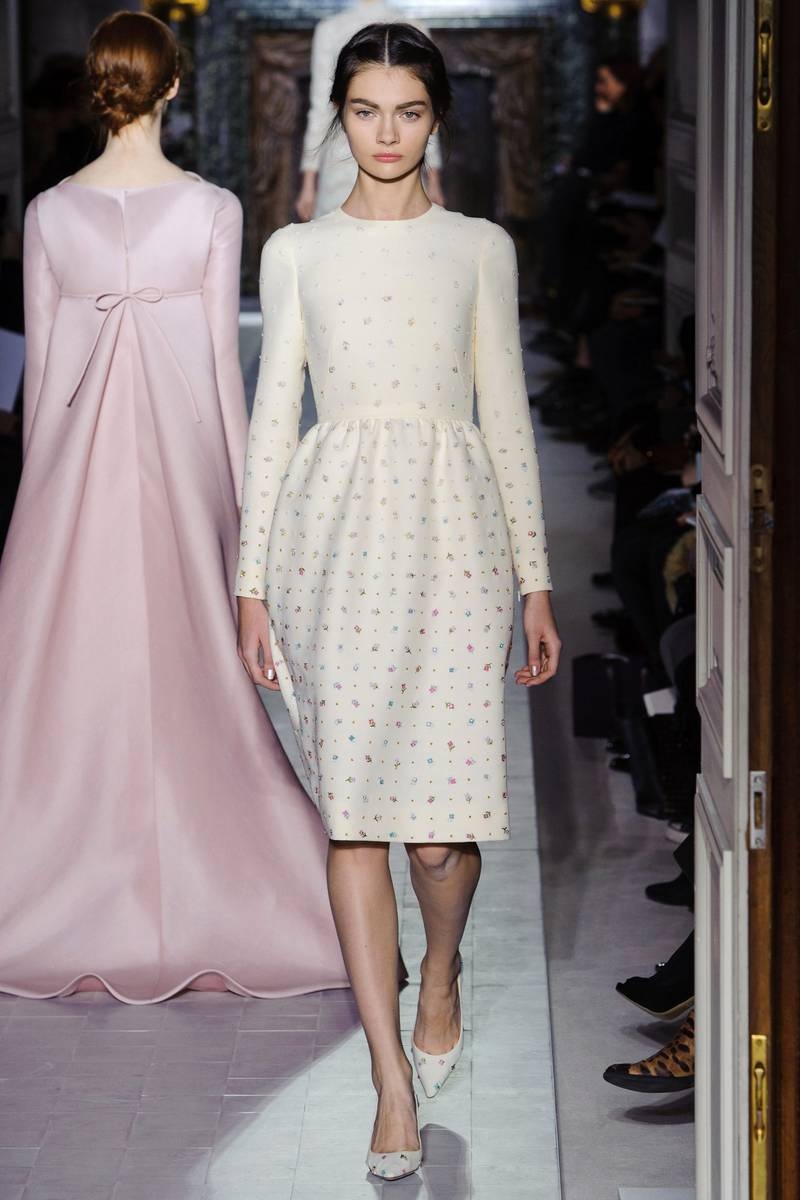
Another piece I love is this smock dress:

image

The shape of this dress seems angelic to me: I love the huge sleeves and flowy fabric,  and I think that the duck egg blue colour keeps it fresh and modern. It would look great with sheer tights, heels and some simple gold necklaces.

I also love these trousers:

image

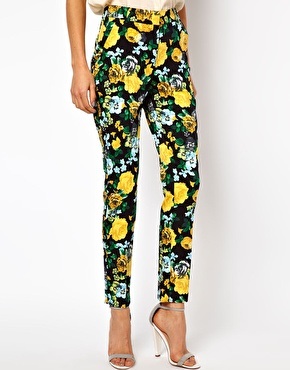
I am obsessed with the dark floral, which I think makes my favorite pattern suitable for the wintry weather. With a gauzy white blouse and either flats or stilettos, I feel these are chic and fun for the coming season.

And finally, a beautiful bag:

image

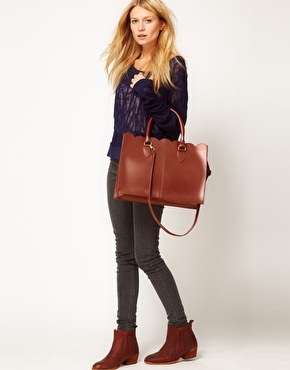
I love this bag! I think it is perfect for practical purposes, school, work or running errands. The size of the bag allows for all of those non-essentials that we still feel we need with us, but the structured fit and warm colour give it a formal vibe. It even has a laptop pocket inside! However, my favorite part is the fanciful scallop detail on the top, which is what attracted me to the bag in the first place.

So, those are some pieces I’ve been loving at the minute. I want to hear from you, what are your must-haves this A/W?

Tagged , ,

Beauty 2.

Hey guys, at the moment I am working on a gigantic fashion post which is proving quite finicky to upload. It should be up by sometime next week. For now, though, here are some of my favorite nail polishes.

Most of the polishes are from seasonal collections and can now only be purchased through Amazon, so I will include links to similar colors if possible.

First up is OPI Pirates of the Caribbean Collection Steady as She Rose. It looks like this in my noticeably messy bottle:

image

It is a super pretty rose color and is perfect for Teen Vogue’s Prada nails tutorial:

image

http://www.teenvogue.com

I am kind of in love with the shade and it is worth getting from Amazon at $7.50 for 0.5 oz.

If you would prefer a shade that is currently in production, shoot for Essie’s Lilacism, which is not a great match, but it is close. That goes for $8.00 a pop at Ulta.

Next up, OPI’s Suzi Take the Wheel, another limited edition polish, which looks like this:

image

I am aware that the picture does it no justice, but it is a gorgeous gray-green color that is still available at Amazon for $7.27. For a similar shade, check out School of Hard Rocks, which is obviously not the same, but will be available for a while. That goes for $8.00 at Ulta as well.

My third pick is OPI’s Suzi Skis in the Pyrenees, an amazingly complex color that is no longer available in store.

image

It is super hard to see in the picture, but check out Amazon (where it goes for $5.90) for a better picture. It is difficult to tell, but it is a slightly shimmery, deep purpley charcoal color that reviewers have described as looking like ink. Trust me, it’s gorgeous. For another option, give Essie’s $8 Velvet Voyeur a try (also from Ulta).

And finally, here is a color you can still buy most places: OPI’s Do You Lilac It, a vibrant pastel purple that goes for $9.00 at Ulta. In the bottle, it looks like this:

image

So give these colors a go! I hope you like them as much as I did!

Tagged , , ,

Eat 3.

I have gotten really horrible at posting regularly, but I really am going to start doing more posts. I am currently working on about five at once, so expect some good stuff soon! But for now, here’s a yummy recipe a friend and I designed. It has some pretty strong flavors, but if you’re a fan of Italian food, you’ll love it!

Tomato-Basil Pasta

Serves 4

Ingredients

  • 1 package of fusilli or penne pasta
  • 1 small jar of julienned, oil-packed sun-dried tomatoes, drained
  • 1 package of cherry tomatoes, sliced into fourths
  • 1 handful fresh basil, chopped finely
  • 1 jar of store-bought basil pesto (or the equivalent amount of homemade)
  • 1-2 cloves of garlic, crushed
  • 1 tsp. olive oil
  • 1 tbsp. toasted pine nuts
  • 1/8 cup Parmesan cheese, finely grated
  • 1 pinch of Italian herb blend
  • Salt and pepper

Instructions

  1. Boil water for the pasta. Add a pinch of salt and then the pasta. Cook according to the instructions on the package, until al dente.
  2. Meanwhile, in a bowl, mix the chopped basil, cherry tomatoes, garlic, and sun-dried tomatoes together. Add the salt, pepper, and Italian herbs and stir in.
  3. When the pasta is cooked, drained, and rinsed, serve onto plates and distribute the pesto amongst the servings.
  4. Incorporate the tomato mixture with the pesto pasta and sprinkle with the desired amount of pine nuts and parmesan.
  5. Drizzle with 1/4 tsp. olive oil each and serve hot! This goes well with warm crusty bread or a simple green salad.
Tagged , , , , ,

Eat 2.

Hey guys, I designed a little recipe for you guys to give a try. This is my own Greek Lentil Salad and it is a super quick and easy lunch, snack, or side. I personally loved it, hope you do, too!
Greek Lentil Salad
image
Ingredients
2.5 cups of ready-cooked Puy lentils
1-2 oz. of feta cheese
3 oz. sugar plum tomatoes
Drizzle of olive oil
Sprinkle of Italian seasoning
Instructions
1. Separate the lentils with a fork and toss.
2. Dice the tomatoes into quarters with a sharp knife.
3. Mix the lentils and the tomatoes together.
4. Drizzle with olive oil and stir in.
5. Crumble feta cheese into the mixture.
6. Sprinkle the Italian seasoning over the top.
Image Source: http://www.bbc.co.uk
Tagged , , ,

DIY

Hi all, I apologize profusely for not posting! Life gets busy…but I will make up for it with some DIY ideas! So I loved the ballet-style shoes from Urban Outfitters in the link here: http://www.urbanoutfitters.com/urban/catalog/productdetail.jsp?id=20330940&parentid=WOMENS_SHOES

Although they are gorgeous, I thought that I could replicate the shoe for half of the price. Just buy some cheap, basic flats from the thrift store (or reuse old ones) and use hot glue or a sewing machine to attach a matching ribbon to the inside of the heel. The glue or stitches should be at least an inch wide and should be centered so as to allow for equal lengths on each side. I hope that isn’t too confusing!

Another easy accessory project is recreating Anthropologie’s adorable Critter Cameo Coin Purse, which can be found in the link here: http://www.anthropologie.com/anthro/product/accessories-travel/26114322.jsp. This adorable little bag can be replicated for much less with a basic wallet, a flat-backed animal bead, a strip of ribbon, and a sewing machine. Simply center the ribbon around the middle of the wallet and stitch into place. Then sew the bead front and center. If you want to embellish further, go ahead but there are your basics!

So I hope you enjoyed this! Pictures of the projects will follow soon, but if you can’t wait, you can buy the items at each of the links.

Tagged , , ,

Runway

image

http://nymag.com/thecut/?f=fashion

Don’t you just love this beautiful dress from Valentino’s Spring 2013 collection? It is refined yet dreamy and the embellishments add interest and texture to an otherwise fairly boring dress. What do you guys think?

Tagged

Beauty

Hey guys, I wanted to share some of my favorite, easy hair ideas. Read on to try them yourself!

Variated Dutch Braid
I’ve gotten SO many compliments on this style and the only tools you need are a hairbrush/comb and 6 bobby pins. All you have to do is brush your hair into two equal segments. Then braid each one in turn, holding onto the end as you fold the braid up onto the back of your head and pin into place. Fasten tightly against the scalp with a second bobby pin per braid towards the bottom, and add a bobby pin behind each ear to tuck excess hair into place. Voila! That was easy, right? And if that’s too blah for you, add a jeweled headband, bandana, or braid or twist your bangs, as well.

Topknot
Before trying this one out, invest in a bun doughnut in at a store like Claire’s. Try to find one that is as close to your hair color as possible, and match the size to the length and thickness of your hair. So besides this, you will need a hairbrush or comb, hairspray, about 8-10 bobby pins, and two plain hair ties. Once you have all the materials, brush your hair backwards so that the part isn’t visible. Then, turn your head upside down, and use either the brush or your hands to gather your hair into a neat high ponytail (on top of your head but not too far forwards) and smooth out any ridges. Turn your head right side up again and once again, smooth out any ridges. Use a hair tie to fasten. Now, slide the bun doughnut over the end of the ponytail and pull down to the base, leaving the hair to hang out of it. Here comes the tricky part: splay your hair over the doughnut evenly so that the entire doughnut is covered. This can take a while depending on how thick your hair is. Once in place, stretch a hair tie over the whole thing, twist the ends around the base, and pin them in place. Now pin any stray lumps or flyaways as well as bangs down, and spritz the entire thing with a light mist of hairspray. Beautiful, right?

Braided Bun
A little more complicated but nothing DIFFICULT. All you need is a hairbrush, 6 bobbies and a hair tie plus additional accessories if desired. So, first, brush out hair along the part. Simple enough. Then, create a small braid on the side with more hair while holding the end up in the air. Release onto opposite side and pin. Now form a large twist along the left side of the head and pin. Brush back the crown of the head a little bit, just so it doesn’t look messy. Once that’s done, just French braid the right side and pull into your basic folded bun (close to the nape of the neck, the kind you make when you’re lazy). And finally, attach your accessories, like sparkly barrettes or pearl twisters.

Hope these inspire you some!

Tagged ,

Eat

A little bit of inspiration for your tastebuds…

When I went to Italy a few years back, of course I went to many a gelateria. The gelato was yummy, but for me the shining star was something called a granita. It looks sort of like a Slurpee and can be consumed in the same way, only it isn’t made of a bunch of junk. It’s basically just various juices, herbs, etc. frozen into ice and then crushed periodically over a period of time. It doesn’t sound like much, but the result is heavenly. I loved them so much that I went and found a book called Granita Magic, by Nadia Roden, which features 55 different flavors of granitas! 55! It is crazy, but it turns out there are so many more iterations than I had imagined. However, I naturally gravitated towards my favorite granita flavor, strawberry, and I have posted the recipe below.

Strawberry Granita (from Nadia Roden’s book Granita Magic)

Ingredients

1 cup water

3/4 cup sugar or to taste

1 1/2 pounds sweet ripe strawberries (about 5 heaping cupfuls)

1 cup fresh orange juice

Juice of 1 1/2 lemons

Simmer the water with the sugar for a minute in a medium saucepan. Remove from the heat and allow to cool. Briefly rinse the strawberries and hull them. Blend the berries to a puree in a food processor. Mix in the sugar syrup and the orange and lemon juices. Taste and add more sugar if needed. Pour the mixture into a wide and shallow container. Cover with a lid, foil, or plastic wrap. Freeze the mixture for an hour or two until it has frozen around the edge. Take the container out of the freezer and scrape the ice with a fork, mixing it from the edge to the center. Repeat the scraping and mixing process every 1/2 hour or so (at least three times) until the entire mixture has turned into small, sequined ice flakes. It is best to eat the granita at once, but if you leave it in the freezer overnight or longer, just let it sit for 10 minutes until it softens a little and then scrap it again with a fork to lighten the texture.

So there you go! Give it a whirl, and if you like it, you can purchase
Granita Magic by Nadia Roden from Amazon for just $4.23 new!

Tagged ,

Celebrity

Hi, everyone! So sometimes I’d like to share celebrity looks I love with you and some commentary on why they work.

Today, I will just have one, but in future, expect to see plenty of famous inspiration.

1334607135_emma-watson-1800

I love Emma Watson’s outfit here from the Coachella festival. I’m usually not a fan of animal print, but this isn’t too overkill, as she has toned down the glam vibe with a boho floppy hat, cozy cardigan, classic bag, and comfy sandals. I think this is the perfect casual summer look. What say you?

Tagged , ,

“There is no way to happiness, happiness is the way,” – Buddha

Wisdom

Tagged ,